
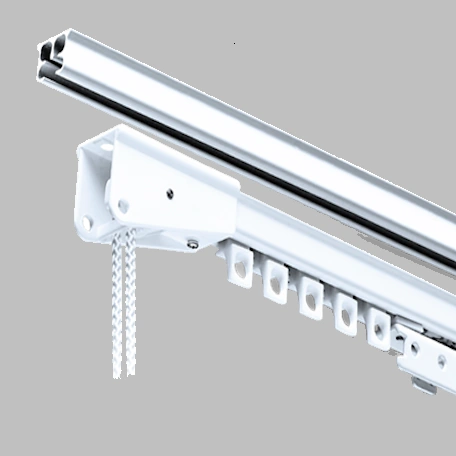
Corded Bay Window Curtain Tracks
Got heavy or tall curtains? A corded track makes opening a breeze. We make each one to fit your bay perfectly and meet UK safety regs
✅ Effortless pull-cord operation
✅ Meets EN13120 child-safety standard
✅ Handles blackout & heavy fabrics
✅ 10-Year guarantee included
Keep reading below to discover lots more about these great bay window curtain tracks. ☟

-
10-Year Guarantee
Free remake if it doesn’t fit — even if mis-measured
-
Video Measuring Guides
Short step-by-steps so you know it’s right
-
No Charge Per Bend
You pay for length only — big savings on multi-bend bays
-
Fast UK Delivery
Recyclable, eco-friendly packaging as standard
Why Choose Corded Bay Window Curtain Tracks for Your Bay Window?
✔️ Easy Operation – No tugging or dragging. Open and close your curtains smoothly using a neat side cord.
✔️ Perfect for Heavy Curtains – The corded mechanism handles larger curtain weights with ease.
✔️ Protect Your Curtains – Keeps hands off delicate fabrics (especially white sheers).
✔️ Made to Measure – Just send us a photo and a few rough sizes. We’ll do the rest.
✔️ Delivered Pre-Bent & Ready to Fit – No DIY bending or guesswork needed.
✔️ Full Support Videos & Guidance – We walk you through every step, from measuring to fitting.
✔️ 10-Year Guarantee – If it doesn’t fit, we’ll remake it. Simple as that.
See the Track in Action
Watch how smoothly our corded bay tracks glide — and how easily they install (no bending, no cutting, no fuss).
Take the Video Tour ➜
This is a ceiling bracket, already fitted in place. These brackets are click-fit. You’ll notice a small lip on the bracket, and your curtain track has a ridge along both the front and back. That lip hooks onto the ridge, and the track clicks into place.
Once you’ve driven the screw through the bracket, it locks the track firmly in position. After fitting, you can add the supplied covers to neaten up the look.
Understanding Cord Safety Requirements
At the cord end, we have a cord loop. By law, this must sit at least 1.5 metres from the floor once the track is installed. We’ll ask for the installation height when you order, so we can make sure the cord drop meets safety regulations.
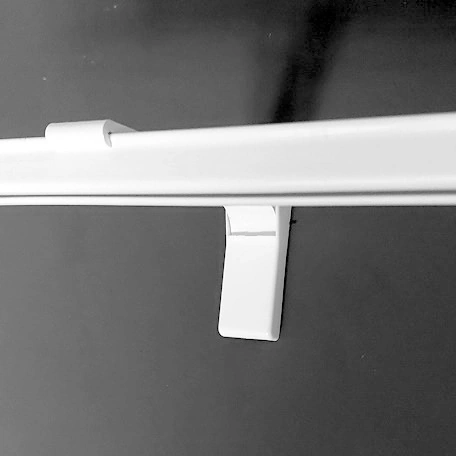
Fitting Wall Brackets at Each End
Now let’s look at fitting the wall brackets at each side of the bay window. These brackets have fixing holes on the top and bottom. Hold the bracket in place above the window, mark the fixing holes, then drill using a 6mm masonry drill bit. Use the supplied wall plugs and screws.
Measure a straight pencil line across the ceiling, then mark 2cm above that line. This ensures the top of the bracket sits 2cm higher than the ceiling line. You’ll also want to position the bracket about 14–15cm out from the corner of the bay.
The front lip of the bracket allows the track to hook in. Just twist upwards until it clicks, then secure it using the screw underneath. Repeat the process on the opposite side.
Securing the Wall Brackets
Today I’m working on a display setup with plasterboard and timber behind, so no drilling is needed. But normally, you’d secure the brackets using plugs and screws.
Once the bracket is fixed, add the neat cover over the top to hide the screws. Do the same on the other side of the bay: pencil line across, 2cm up, 14–15cm out.
Clicking the Track into the Wall Brackets
Now take your curtain track and click it into the wall brackets. You’ll need someone to hold one end while you secure the other. Hook the track into the bracket lip, twist it upwards until it clicks, and then tighten the screw underneath to lock it in place. Repeat for the opposite end.
Fixing the Ceiling Brackets Within the Bay
Next, drive the screws directly into the ceiling to support the track within the bay. Do this for all brackets around the bay. If you’re not confident the screw fixings are secure enough, you can move each bracket slightly, drill and plug the ceiling, and screw it in properly.
Reinforcing a Ceiling Bracket (If Needed)
If a bracket isn’t secure, remove the screw, slide the bracket slightly, and drill a new hole using a 6mm masonry bit. Insert a wall plug, reposition the bracket, and refit the screw. This gives you a nice firm fixing. Then, clip the cover over the bracket for a tidy finish.
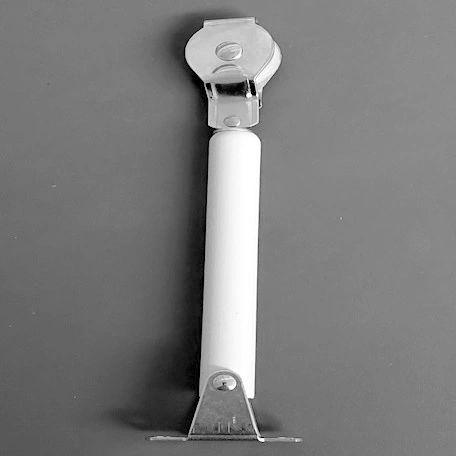
Installing the Cord Tensioner for Safety
The cord loop running down the side of the window must be secured for safety. This is where the cord tensioner comes in. Hook the cord through the front into the pulley. I’ve already pre-drilled the holes and added plugs.
To install it properly, remove the cord from the tensioner first. Then hold the unit in position, mark your drill holes, and screw it in place. Once secured, pull up the spring ring and rethread the cord into the tensioner. This holds everything neatly and safely in place.
Final Step – Hanging Your Curtains
Once everything is installed, your corded bay track is ready. Just pull one cord to open the curtains, and the other to close them so they meet in the middle.
You’re now ready to start hanging your curtains using the gliders in the track. Pin hooks or nylon curtain hooks will both work depending on your curtain style.
Thanks very much for watching — I hope this video was helpful!
✅ Quick Steps: Fitting a Corded Bay Track
- Ceiling bracket (click-fit): Hook the track ridge onto the bracket lip, click into place, drive the screw to lock, then add the cover.
- Plan cord safety: Cord loop must finish at least 1.5 m from the floor. We’ll set the drop from your installation height.
- Fit end wall brackets: Hold above the window, mark top/bottom holes, drill 6 mm and plug. Draw a straight ceiling line, then mark 2 cm above it; position brackets 14–15 cm from the bay corners.
- Click track into wall brackets: With a helper, hook into the lip, twist up until it clicks, then tighten the locking screw underneath. Repeat on the other end.
- Fix ceiling brackets within the bay: Drive screws through all ceiling brackets around the bay. If a fixing is weak, slide the bracket slightly, re-drill 6 mm, plug, and refit; add covers.
- Install cord tensioner: Remove the cord, mark/drill/plug, screw the tensioner to the wall, re-thread the cord over the pulley, and ensure the loop height is ≥ 1.5 m and under tension.
- Final checks: Test cords (one to open, one to close to centre). Hang curtains on the gliders with pin or nylon hooks and check for smooth travel.


Better Than DIY Bendable Tracks
What You’ll Receive
A fully assembled corded bay curtain track
- ✔️ Pre-shaped to your exact bay
- ✔️ All brackets and fittings included (bracket approx. every 30cm)
- ✔️ 20 gliders per metre of track
- ✔️ Cord mechanism fitted and tested
- ✔️ Full fitting video and support
- ✔️ Our 10-year guarantee
🚚 All delivered in a strong, protective box 📦 — ready to go.
“💻 How to Order – It’s Simple (Even If You’ve Never Done This Before)”
Ordering your corded bay window track is straightforward – and you don’t need to be a DIY whizz.
Here’s what to do:
- Decide if you want the track to run just within your bay, or to also include returns (flat wall sections at each end)
- Take a front-on photo of your bay showing the full sill
- Measure roughly around the bay (including returns if needed)
- Use the instant calculator for a quick price
- Once you order, we’ll send you a full measuring guide and clear instructions on choosing your cord position (left or right)
We’ll check over everything and let you know if anything looks off. You’re never left to guess 🙂
“Corded Track Details at a Glance”
- Operation: Cord-drawn (choose left or right side)
- Material: Powder-coated aluminium
- Brackets: Nylon, spaced approx. every 30cm
- Gliders: 20 per metre of track (UV-stabilised)
- Profile: 15mm deep × 20mm wide
- Cord Drop: made to finish 150cm up from the floor (makes child safe)
Strong, smooth, and built to last – we’ve used these same tracks in trade jobs for years.

Strong, smooth, and built to last – we’ve used these same tracks in trade jobs for years.


💬 Real Reviews from Real Customers
“Not sure what I needed, but I emailed a photo and Lee replied quickly with annotations that made it really easy to understand. Fits perfectly. Curtains glide effortlessly.”
– James, Flitwick
“Not sure what I needed, but I emailed a photo and Lee replied quickly with annotations that made it really easy to understand. Fits perfectly. Curtains glide effortlessly.”
– James, Flitwick
“The order process and measuring guide were well presented and easy to follow. The tracks fit a treat and were easy to install after watching the video. Highly recommend!”
– Diane, Felixstowe
Frequently asked questions
Frequently asked questions
Yes — during the order process we’ll ask which side works best for your room layout. Just choose what’s most convenient and Ezecurtains will set it up that way for you.
Absolutely. We’ll check your order details and bay photos to make sure you get the correct brackets for a smooth, simple install. Tip from Lee: if you’re not sure which way is best, just send me a photo and I’ll confirm for you.
Yes — perfect for pencil pleat, pinch pleat, and wave heading curtains (if you select the wave version when ordering). Not sure which you have? Send a quick photo and we’ll confirm before you order.
Yes — every corded bay track from Ezecurtains comes with the required child-safety tensioners and fitting guidance to meet UK regulations. Please make sure the safety device is installed as shown in the instructions.
Next step: once you’ve skimmed the FAQs, click Get My Price for your instant made-to-measure quote, or send me a bay photo and I’ll confirm the best setup for your curtains.
Still unsure about something?
Just send us a quick message or photo of your window — we’ll be happy to help you decide if this corded track is right for you.
✅ Ready to Get Started?
If you want a smarter, smoother way to control your bay curtains — you’re in the right place.
[☛ Get Your Instant Price ➜]
Still have questions? Just send a photo and we’ll guide you.
Ezecurtains – Helping UK homes fit high-quality curtain tracks for awkward bays since 2010. No stress. No sales fluff. Just good advice and a great product.
How to Get a Price and Place an Order
Let me show you how simple it is to get a price and place an order for a custom-made corded bay track here at Easy Curtains.
The first step is choosing your track options. After placing your order, you’ll be directed to an order confirmation page. On that page, you’ll find a button that takes you to the final sizes form. That’s where you’ll give us all the measurements we need to make your bay track correctly.
Don’t worry — we’re always happy to help if you’re unsure at any stage.
What You’ll Need to Get Started
To complete the final sizes form, you’ll need two things:
- A photo of your bay window
- An overall width measurement (following the bay, including any returns)
This size doesn’t need to be exact — being within a few centimetres is fine.
Selecting Your Bay Size
The first option on the form is selecting the overall bay size. Once chosen, press the “Next” button.
How Your Track Will Fix in the Bay
Next, choose how your bay track will fix. There are five options. For example, option 2 is “Ceiling with wall-fix returns out of the bay,” which is a popular choice.
If we think your selected option doesn’t match your bay, we’ll check in with you before we start. Press “Next” to continue.
Selecting Your Bay Shape
Now select your bay shape using the drop-down menu. Once you choose an option, an image of that shape will appear.
If it doesn’t look right, try a different shape — or click the “Bay Window Styles” link. This will take you to a page with lots of bay images and their names.
Still unsure? Click the link to send us a photo of your bay. If it’s not listed, we’ll create and add it for you and let you know when it’s ready to use.
Once you’re happy, press “Next.”
Track Supplied in Two Halves
Your bay track will be supplied in two halves that butt together at the centre pulley. This makes fitting a corded bay track really simple. Press “Next” to continue.
Select Curtain Overlap
Now choose how your curtains will overlap. Select one of the available options, then press “Next.”
Track Installation Height
Let us know the height from where the track will be installed down to the floor. This helps us make sure the cord control loops meet child safety laws.
The cords must finish 150cm above the floor. After entering the installation height, tick the box to confirm and see the cord loop length. Then press “Next.”
Upload a Photo of Your Bay
We can’t process your order without at least one photo of your bay. Make sure the whole bay is visible. If unsure what to send, click the “Photos of Your Windows” link — it opens in a new tab so you don’t lose your place.
If you’re on a smartphone, just tap the upload button, open your camera, and take the photo. It will automatically be added to the form.
If you’re still in the research stage and just want a quote, you can upload any image for now. But if you decide to place your order, use the back button to upload a proper photo of your bay — and not one of your pet looking cute!
Then press “Next.”
Add Curtain Hooks (Optional)
Now you can choose curtain hooks to add to your order:
- Nylon hooks – for pencil pleat curtain headings
- Zinc metal hooks – also for pencil pleats
- Zinc pin hooks – for custom double or triple pinch pleat headings
Hooks come in packs of 50. Most bay windows will need two packs. Press “Next” to continue.
Final Review and Payment
This is the final page. You’ll see a list on the right showing all your selections, and the total amount to pay at the bottom.
Enter your email address (twice to confirm), and the form will open to collect your name, address, and phone number. Then enter your card details, including the postcode the card is registered to.
Click the “Place Your Order” button to complete your purchase. You’ll then be redirected to the order confirmation page.
What Happens After Ordering
On the confirmation page, you’ll find a button linking to the final sizes form. You’ll also receive this link by email as part of your order confirmation.
If you need help at any stage, just click the help button in the bottom right corner of your screen. Still unsure? You can always reach us using the contact form.
Introduction
Let me show you how simple it is to get a price and place an order for a custom-made regular bay window curtain track here at Easy Curtains. The process has two main parts: choosing your track options, then providing your final sizes.
After Placing Your Order
Once you’ve placed your order, you’ll be directed to the Order Confirmation page. On this page is a button that takes you to the Final Sizes page. This is where, following a template, you’ll give us all the measurements we need to make your new bay window curtain track fit perfectly. Don’t worry — we’re always happy to help if needed.
You’ll need two things to complete this form:
- A photo of your bay
- An overall width of your track, following the bay and including any returns (if needed). This doesn’t have to be exact at this stage — within a few centimetres is fine.
Selecting the Overall Bay Size
The first step is to select your overall bay size. Once chosen, press the Next button.
Choosing the Fitting Method
Now choose how your bay track will fix in your bay. You have five options. In this example, we’re choosing option two: ceiling fix with wall-fixed returns out of the bay. This is a popular option. If we think you’ve selected the wrong option, we’ll query it with you before starting. Then, press Next.
Choosing the Bay Shape
Next is the bending service — selecting your bay shape. Open the drop-down menu and choose your bay shape. An image of the chosen shape will appear. If it doesn’t look right, choose another option. If you’re still unsure, click the Bay Window Styles link to view many examples with names. If your bay shape isn’t listed, use the link to send us a photo. We’ll create and add it for you, then let you know it’s ready. Press Next.
Middle Track Option
Choose from two options for the middle of your track:
- Overlapping tracks – great for overlapping curtains that hang well.
- Heavy-duty joining splice – strong and simple join.
Select your preferred option, then press Next.
Optional Extras
Now you can choose optional extras for your custom bay window curtain track:
- Brakes – add to keep curtains in place (I selected “Yes”).
- Curtain draw rods – available in pairs, 75cm long (I selected a pair).
- Curtain hooks – choose from nylon, zinc metal, or zinc pin hooks (packs of 50). I selected nylon hooks and two packs (typical for bay windows).
Each option has a video link showing what it is and how it works. Press Next.
Uploading a Photo
Upload a photo of your bay window. Stand well back to get the whole window, plus some wall on each side, and include the windowsill. If using a smartphone, pressing the Upload button will open your camera. Your photo will be added automatically. Press Next.
Final Confirmation and Payment
This is the final step. On the right, you’ll see a list of your selections and the total price at the bottom. Enter your email address (and confirm it), then fill in your name, address, and phone number. Enter your card details, including the billing postcode, and press the “Place Your Order” button.
You’ll then be redirected to the Order Confirmation page, which has a button linking to the Final Sizes form. You’ll also receive this link in your order confirmation email.
Need Help?
If you need help at any stage, use the Help Assistance button in the bottom-right corner of your screen. Still unsure? Contact us via the contact form — we’ll be happy to help.
Not sure what bay shape you have? [ Then check out the bay window styles with pictures ]
Corded Bay Track Price Calculator
Need some help?
Not sure how to complete this form above to get a price for your bay. Then watch the help video just above the calculator.
Any problems using this form then please just ask the 24/7 Help Assistant in the bottom right of your screen. You will get an instant answer any day or time. Still not finding the answer!
Then send us a message here (with a photo) and we will get back to you within 24 hours. Or call call us on 0800 246 5091 between 9am til 6pm (Mon to Sat).
Be aware we currently only deliver to the United Kingdom.