
Best Bay Window Curtain Tracks for DIY Fitting (No Bending Required)🛠️
Tired of fiddly DIY tracks that never quite fit?
Our regular bay window curtain tracks are made-to-measure and pre-shaped to your exact bay — no bending, no cutting, no stress. They arrive ready to fit, with everything you need.
Designed for real UK homes, this is our most popular, all-round option — custom-shaped, easy to install, and backed by expert support if you need it.
We check every order before manufacture and will contact you if anything doesn’t look right.
Or scroll down to see how the track works, view real installations, and watch the fitting video.

-
10-Year Guarantee
Free remake if it doesn’t fit — even if mis-measured
-
Video Measuring Guides
Short step-by-steps so you know it’s right
-
No Charge Per Bend
You pay for length only — big savings on multi-bend bays
-
Fast UK Delivery
Recyclable, eco-friendly packaging as standard


Click any image for larger view
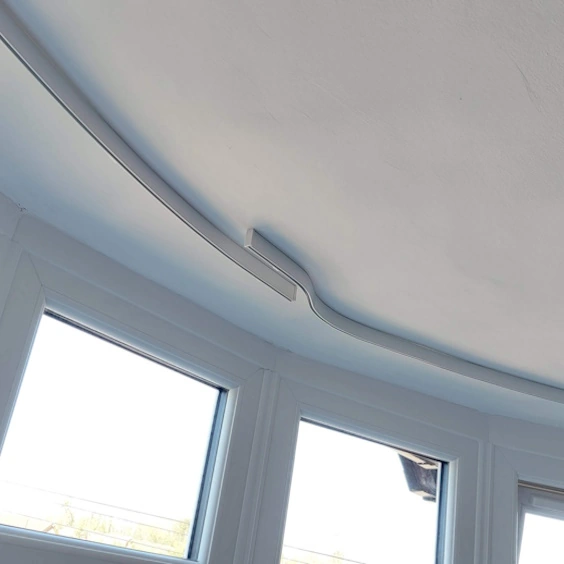
Customer bay window before and after images
Using our regular bay window curtain tracks allowed this customer to hang curtains in this very large square bay window with returns. You can transform the way your curtains hang in your bay with our help here at Ezecurtains.

Before – Looking a little stark and clinical

After – Looking far more cosy and welcoming
🎥 See the Track in Action!
Introduction
“Hi. Welcome to Ezecurtains. And I want to have a quick chat with you about our regular curtain track. This can be made to fit any shape bay window, straight windows, and it’s great for any domestic type curtains, wide curtains, long curtains, blackout curtains, handle them all.
Track Options
So let’s have a quick look at how easily these curtains glide across this track. Now these curtains have overlapped because you’ve got the overlapping track option on here, which is great for bedrooms, but pretty much any window where you want a really neat finish and the curtains to overlap properly. So let’s have a quick close-up of the track itself and the bracket options.
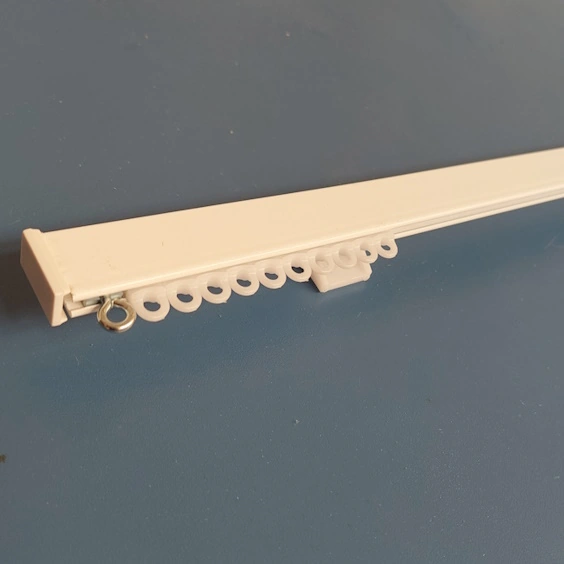
Close up of the track
Here we have the track, and it’s a really strong profile and it takes a bit of effort to twist it. Once this is fitted into the bracket, ceiling, or wall fix, there’s almost no flex in it at all. So that’s why I mentioned earlier that you can hang pretty much any domestic weight curtains on it.
Bracket options
Now, if we turn it over, you can have a look at the bracket options that we’ve got on here. We’ve got three centimetre, four centimetre, seven centimetre brackets. So it projects a little bit further away from the wall if you need it to.
Ceiling fitted option
Then we’ve got the ceiling fix bracket on this end. And if we turn it sideways, the ceiling bracket has got a slope on the back. So when that track is fixed to the ceiling, you have to be almost underneath the track to actually see the bracket. So that’s a really neat option.
Conclusion
So if you would like to order one of these tracks, then use the calculator below to get an instant price for one to fit your window perfectly.
Why Choose Our Bay Window Curtain Tracks?
✔️ Custom Made – Built to match your exact bay shape. Just send us a photo and some rough sizes.
✔️ No Tools or Bending Needed – We pre-shape your track in our workshop using high-grade aluminium and send it ready to fit.
✔️ Smooth Curtain Movement – The gliders are designed for easy, effortless curtain opening and closing.
✔️ Strong & Discreet – These tracks handle any domestic curtain weight and sit close to the ceiling for a neat look. “Ideal for heavier curtain styles — this is a heavy-duty curtain track option”
✔️ Easy to Install – You’ll get the right brackets and all the fittings. Watch the fitting video and you’re sorted.
✔️ 10-Year Guarantee – If it doesn’t fit, we’ll remake it. No quibbles.
Better Than Bend-it-Yourself Tracks
Not Sure this track is right for you then check out these options!
Not quite sure what you’re after? Don’t worry — we make tracks for all types of windows and curtain styles:
How to Order
“Ordering is Easy – Here’s What You’ll Need”
Ordering is easy. You don’t need to be a DIY expert!
Just decide if you want a track for bay window with returns. Or a track just within the bay only.
- 📷 Take a photo of your bay window (from front-on, showing the full sill)
- 📐 Measure roughly around the bay (and returns, if any)
- 🧮 Use the instant calculator for a price
- 📏 Once ordered, you’ll get a link to our full measuring guide
We’ll double-check your sizes and flag anything that looks off. You’re not on your own here
🛠️ Regular Bay Track Spec!
- Operation: Hand-drawn
- Material: Powder-coated aluminium
- Brackets: Nylon, spaced approx. every 30cm
- Gliders: 20 per metre of track
- Profile: 23mm deep × 10mm wide
- Drop: 30mm from ceiling to glider bottom

Fitting your bay window curtain track
All of our bay window curtain tracks are designed to be straightforward to fit. If you’re fitting it yourself (or passing it to a local handyman), we’ve put together a clear step-by-step fitting guide that shows exactly what to do.
See our regular bay window curtain track fitting guide
👀 Real Reviews from Real Customers
“The order process and measuring guide were well presented and easy to follow. The tracks fit a treat and were easy to install after watching the video. Highly recommend!”
– Diane, Felixstowe
“Not sure what I needed, but I emailed a photo and Lee replied quickly with annotations that made it really easy to understand. Fits perfectly. Curtains glide effortlessly.”
– James, Flitwick
“I’ve ordered and received 2 curved bay window curtain tracks and they are perfect.
I was completely confused on what to do with our bay windows until I contacted Lee. He gave me a detailed description on how to measure and order. He is definitely an expert!
They rails are of great quality and fit perfectly!.”
– Llinos, Bangor
💬 Frequently asked questions
Yes — most traditional headings work perfectly with our standard glider bay tracks at Ezecurtains.
These styles can be used:


These styles can’t be used on standard glider tracks:


Not sure which heading you’ve got? Send a quick photo with your enquiry and I’ll confirm before you order — it’s part of our free pre-order check.
Both — choose your fitting position at checkout and we’ll send the correct brackets. If you select ceiling-fix, we pre-fit the brackets to your track for you.
Every order includes a free photo review: send us a bay photo and Ezecurtains will double-check you’ve picked the best fitting option for your window. If we spot a better choice, we’ll advise and update your order so you get the right brackets first time.
Low clearance or inward-opening windows? Our lower-profile option may suit you better — see the Slimline bay window curtain track.
Don’t worry — we manually sense-check every set of sizes and will contact you if anything looks off. If the track still doesn’t fit, we’ll remake it at no extra cost.
Tip from Lee: include a full-room photo of the bay with your sizes — that lets us spot tricky details and save you time.
Yes — mainland UK delivery is free and fast. Your made-to-measure track is securely packed in plastic-free, recyclable packaging and sent on a tracked service.
Slimline: lower profile for tight clearances (sloped ceilings, inward-opening windows, shutters).
Regular: the classic look with the same smooth gliding and weight capability as Slimline.
Unsure which to pick? Send a quick bay photo — Ezecurtains will recommend the best match for your window and curtains.
Next step: once you’ve skimmed the FAQs, use Get My Price to see your made-to-measure cost, or send your bay photo and I’ll confirm the best setup for you.
✅ Ready to Order?
✅ 10-Year Guarantee ✅ Free UK Delivery ✅ Trusted by 1,000s of UK customers
You’re just one photo and a few sizes away from bay curtains that glide like a dream. One more scroll and you will see the simple to use price calculator and order form.
You don’t need to be an expert — we’ll guide you through it.
- It only takes a minute to get a price
- The questions are simple and explained
- You won’t be locked in or asked to pay yet
- We double-check every order before manufacture
If anything doesn’t look right, we’ll contact you before making your track.
Regular Bay Window Curtain Track – Price & Order
Answer a few simple questions and we’ll calculate the exact price for your made-to-measure bay track.
Need a bit of help before ordering?
If you’re unsure about anything, you’re not on your own. We’re happy to help you get it right first time.
You can send us a message with a photo, or give us a quick call — we’ll get back to you within 24 hours.